- You can also find tutorials and demo videos on our YouTube channel
- Also don’t forget to join our Discord server
Niagara FX with different audio tracks
Setting up submixes
In UE when you want audio to be routed into different channels you can use with audio spectrums, you need to create submix objects and route them as you need it. Then you can assign those submixes to the audio spectrums in the niagara effects. Finally you can set the properties of your audio tracks to route to the desired submixes
- In the UE content browser create an “Audio->Mix->Sound Submix” asset for each channel/audio track you need
- Drag your audio files into the content browser and edit all resulting “Sound Wave” assets (Audio Files). Set the “Base Submix” property to one of your “Sound Submix” assets that you want the audio to route to.
- Open your Niagara assets and edit the “AudioSpectrum” property to read from one of your “Sound Submix” assets that you want to spectrum analyzer to use
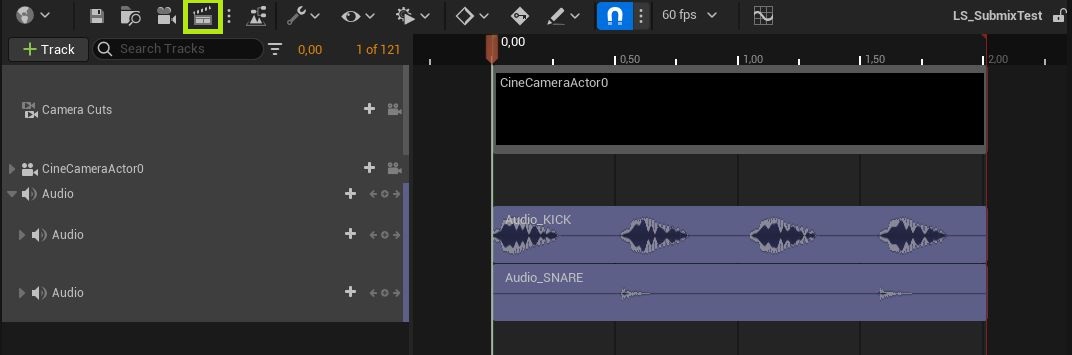
- Create a “Cinematics->Level Sequence” and add your audio tracks and a camera to it. Now when you hit play in the sequencer window you should see the niagara effects reacting to the different audio tracks.
Rendering movie sequences with submixes
Up to at least UE5.2 it only works without submixes so you can only have 1 audio to listen to. We will update this information once this works in UE.
With submixes this does not work as expected. The niagara effects will either behave as they are always triggered by audio or not at all. We could not find any configuration yet that produces a video that has it correctly. So if you get it up and running in the editor you only have the option to capture a live video with plugins like the OffWorldLive Tools. This lets you write camera output directly to video or to live-stream via various protocols.
Rendering audioreactive Movies

Basic setup
To render with Movie Render Queue check the following steps:
- Have a level sequence with your desired audio in it
- Setup render settings and movie render queue
- Setup ffmpeg (optional)
In UE5.0 the audio and video still did not match every time. In most cases it worked out of the box but sometimes it would not work regarding the efforts. This may have changed in subsequent versions of the engine.
Render Settings & Render Queue
If you do not have any render settings and render queue assets you need to create some.
Note that all the Audio Reactive FX asset packs contain ready to use render settings and render queue assets as well as a demo level and level sequence to demonstrate this.
Official Documentation:
– Render Settings
To create render settings and render queue, open up the sequencer window for your level sequence like this and press the render movie button
This will open up the “Movie Render Queue” window.
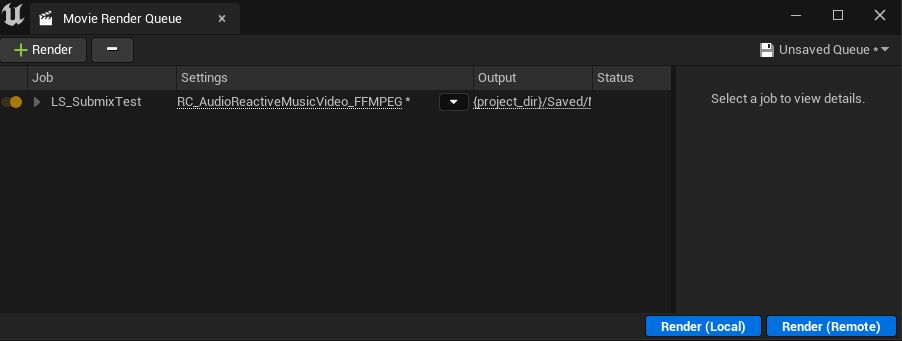
In the top right where it says “Unsaved Queue”, click save as and save your movie queue asset.
Then click on the name in the “Settings” collumn to open up the render settings window. Create all the settings you see in the image by clicking on the top left “+ Setting” button.
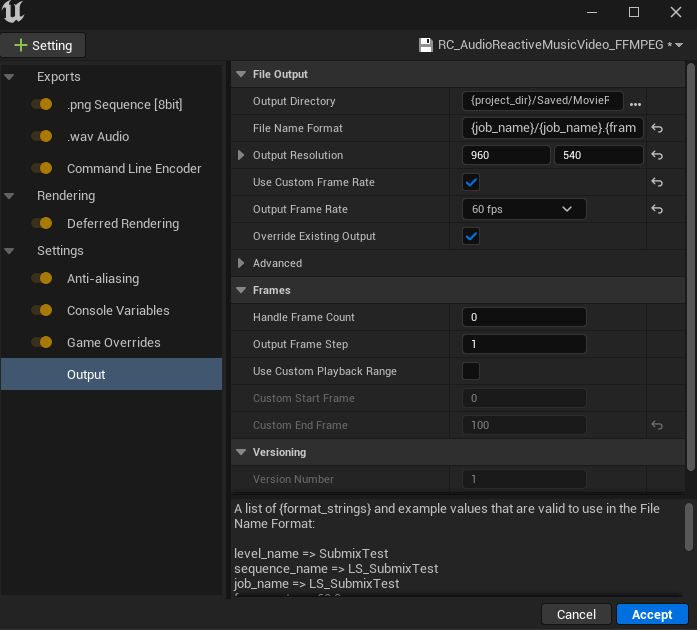
- Command Line Encoder: This handles ffmpeg rendering. If you dont need that and you only need an image sequence you can skip this and use any export you like. See the next section how to set this up.
- Anti-aliasing: you need to set the “Temporal Sample Count” to 1. Otherwise audio and video will be out of sync. This might be fixed with UE5.4 but needs verification.
- Console Variables: we add the following command line variables. That is what we think is best but not all of them might be neccessary. Also feel free to add yna variables that you need to create the visual results you want.
– r.ScreenPercentage 200
– Sequencer.Audio.IgnoreAudioSyncDuringWorldTimeDilation 0
– Sequencer.Audio.MaxDesyncTolerance 0
– Sequencer.Audio.UseAudioClockForAudioDesync 1 - Output: in the output panel set “Use Custom Framerate” checked and “Output Frame Rate” to the value you set for your “Level Sequence” asset. This needs to be the same. Again this might change with UE versions.
- Save the configuration by clicking the top right save dropdown and select “Save As”
- Then press the “Accept” button to close the window
Now you can hit the “Render (Local)” button in the “Movie Render Queue” window to render your sequence.
Rendering movies with ffmpeg
Download ffmpeg from the official source here. For windows i recommend to download from here. Download a zip or 7z file and unpack it to a location on your drive you easily find. Creating an “ffmpeg” folder directly on your C: drive or other drive helps shorten the commands.
<ffmpeg dir> will refer to the directory that you unpacked/installed it to. This is the directory that should contain a “bin” folder which contains the “ffmpeg.exe”
In your project settings find the “Movie Pipeline CLI Encoder” section.
– Set “Executable Path” to “<ffmpeg dir>\bin\ffmpeg.exe”. this will tell the engine where to find ffmpeg
Set the following variables. Refer to the ffmpeg documentation to find suitable values. The values shown here are just examples for getting it to work.
– Set “Video Codec” = libx264
– Set “Audio Codec” = aac
– Set “Output File Extension” = mp4
– Set “Command Line Format” = -hide_banner -y -loglevel error {VideoInputs} {AudioInputs} -acodec {AudioCodec} -vcodec {VideoCodec} {Quality} {AdditionalLocalArgs}”{OutputPath}”
– Set “Video Input String Format” = -f concat -safe 0 -i “{InputFile}” -r {FrameRate}
– Set “Audio Input String Format” = -f concat -safe 0 -i “{InputFile}”
Note that values bracketed with {value name} take the values from other properties that you just set. Most importantly the {AdditionalLocalArgs} value takes the settings from the “Render Settings” asset that you use for rendering a sequence.
In your “Render Settings” asset go to “Command Line Encoder” section. “Additional Command Line Arguments” set something like
“-g 15 -profile:v high -bf 2 -pix_fmt yuv420p -movflags +faststart”
This is part of the ffmpeg rendering command so read up the ffmpeg documentation if you want to change this.
You can also read the official UE documentation on this topic here.
How to use Audio Reactive effects
Basic usage
The Maps folder in Audio Reactive FX asset packs contain examples of how to use the assets effectively. Each audio-reactive asset has a parameter called AudioSpectrum, which allows you to choose the audio submix that the effect will respond to. Submixes are essentially different audio channels that can provide different audio sources, such as music, sound effects, or voice chat. If no submix is selected, the effect will respond to the project’s master submix by default. If your project is newly created or has its default settings, this means that the effects will respond to all in-game audio.
The demo maps include an instance of the “BP_AudioPlayer,” which plays a short loop of music so that you can hear the effects respond when the map is opened. If you’d like to remove the sound, simply select the “BP_AudioPlayer” actor in the map, choose its audio component, and clear the Sound property.
How to enable audio react from microphone & line-in
- Connect a microphone to your PC (USB or audio plug) or connect an audio source to your PCs line in.
- Open up your project in Unreal Editor or create a new project.
- Drag an “BP_AudioCapture” from the Blueprints/Tools folder into the map. This will instantly enable enable audio capture. This means if you have a microphone connected, the effect should react to your voice. If you have an external audio source on the line in, the effect should react to it. Note that both are possible simultaneously.
- place the audio reactive effects you want in your map. they should now all react to the captured audio.
How to enable audio react from your own audio file
- Open up your project in Unreal Editor or create a new project.
- Add your audio to the project. To do this, drag a supported audio file (WAV, Ogg-Vorbis, AIFF or FLAC) from your file browser into the content browser. You should now have a SoundWave asset in your content browser.
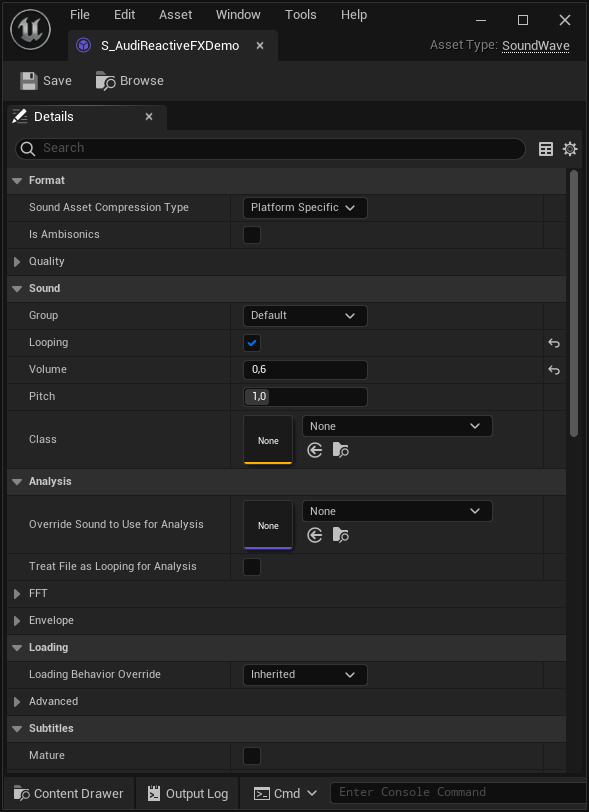
- If you want to make the sound looping, right click the SoundWave asset and select “Edit…”. This opens up the sounds settings like in the following image. Check the “Looping” checkbox and save the SoundWave asset.
- Now drag the “BP_AudioPlayer” blueprint from the content browser into your map. This will create a “BP_AudioPlayer” actor in the map.
- Select the newly created “BP_AudioPlayer” actor in the map like in this picture, showing the demo map. You can select it in the viewport or from the outliner window. (Note that the image shows effects from another pack)
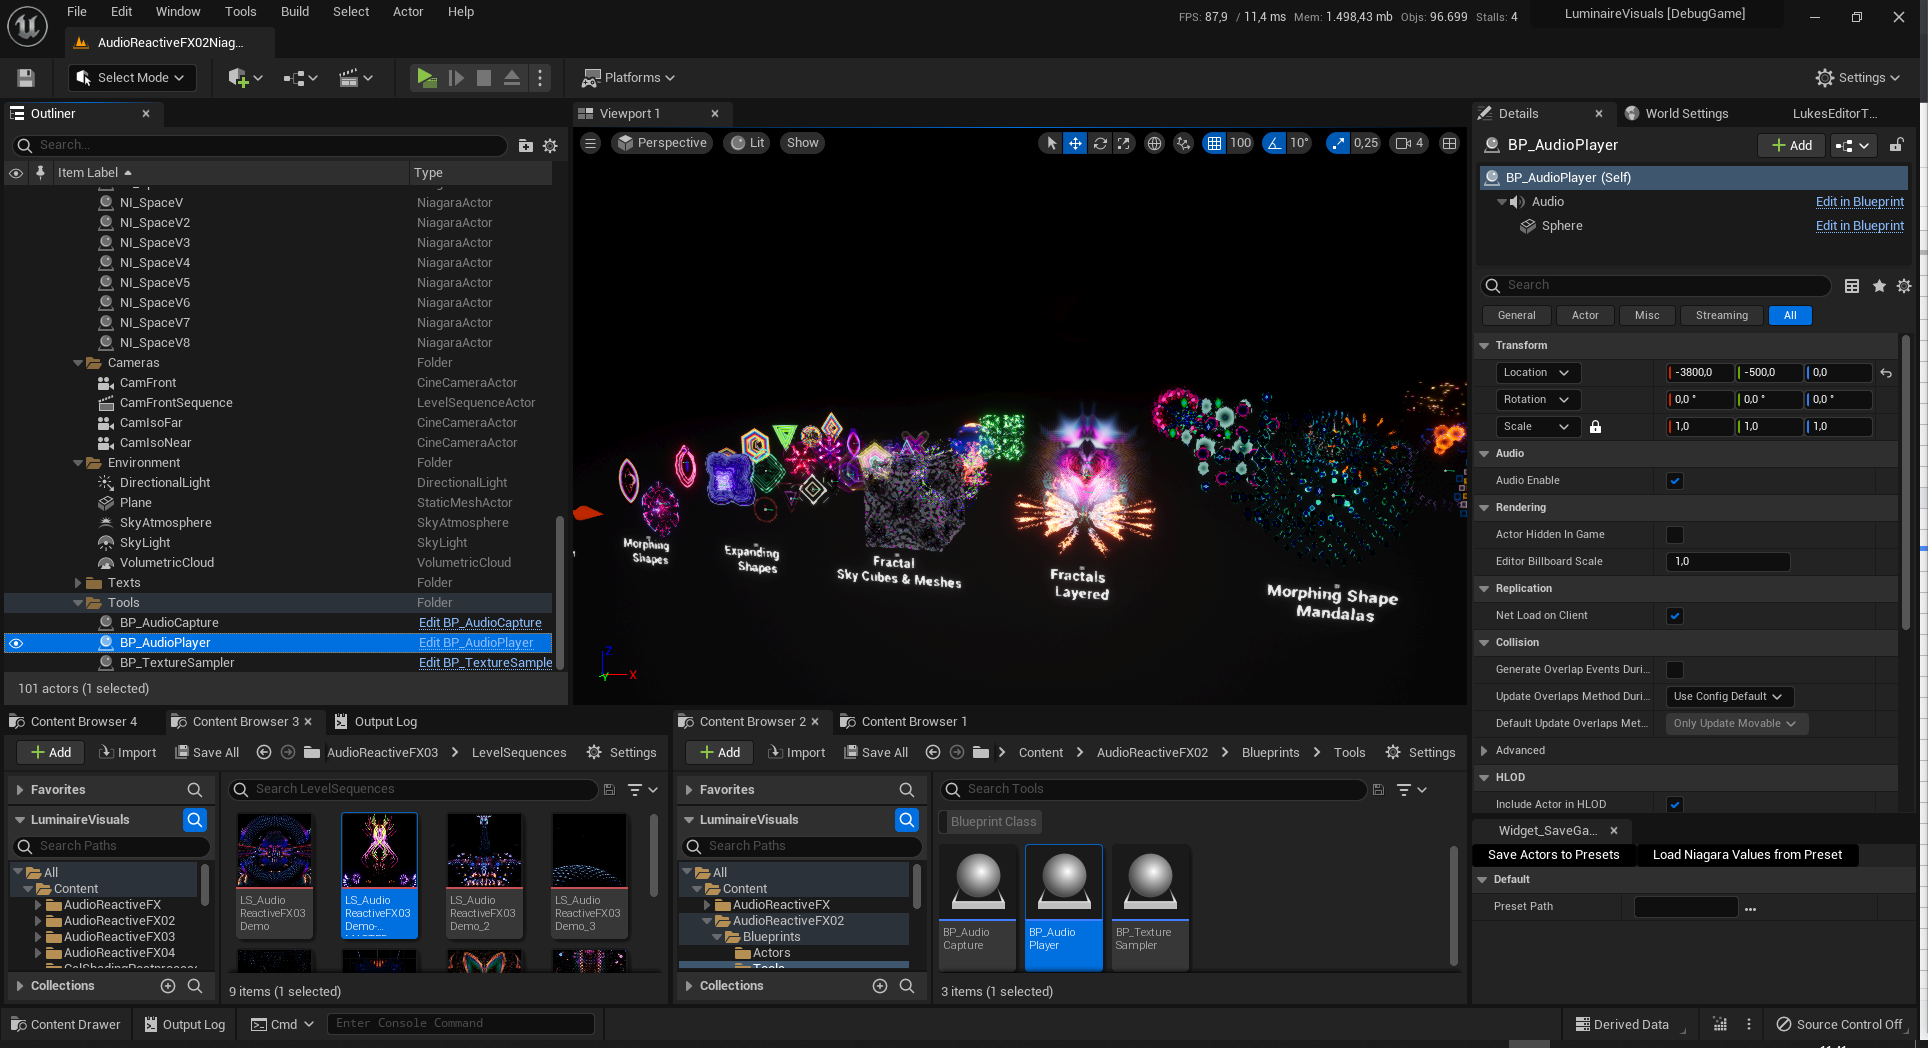
- Now you will see the BP_AudioPlayer’s details in the details panel of the editor like shown in the following image.
- Select the “Audio” component in the details panel like shown in the image. Note the “is UISound” checkbox. If this is enabled, it is always played like a global background sound. This is enabled by default. When disabled the playback has to be started manually. This can be triggered from blueprint, c++ code or other editor tools like the sequencer.
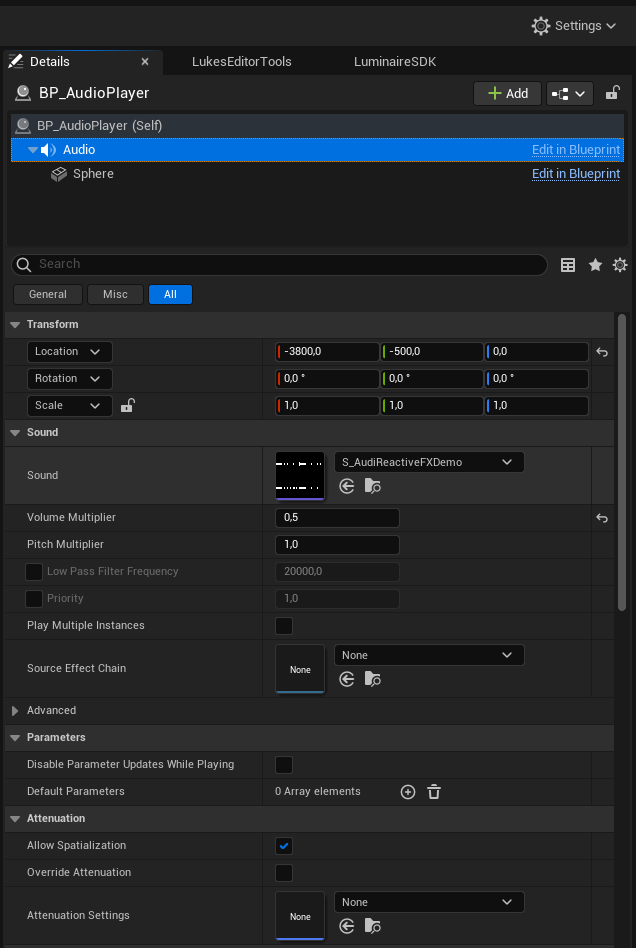
- To set your own audio you can either drag the previously created SoundWave asset from the content browser to the “Sound” property or you can open the dropdown and select one of the supported assets there. The next two images show both ways.


- Once you have set your own audio it will start to play (when the “Is UISound” checkbox is still checked). When the sound is set to be looping, it will play in endless-loop.
- if it does not start to auto play the audio, check the “Is Playing” checkbox of the AudioAnalysisTool actor.
How to enable audio react from in-game sounds
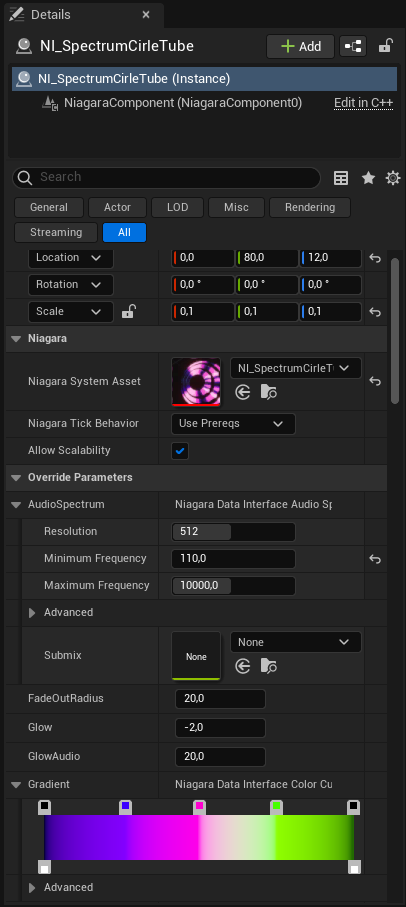
To make the effects respond to in-game sounds like sound effects and music, you’ll need to select the appropriate audio submix. This can be done in the Details panel of the effect. To access the panel, select the effect in the map (either in the viewport or in the Outliner), and navigate to the “Override Parameters” section. Once there, expand the “AudioSpectrum” property to reveal the “Submix” parameter. From there, you can select the desired submix, and the effect will respond to the corresponding audio source.
- If you play all music and sounds without a submix set (empty property) or with the project’s default submix, then you don’t need to change the submixes on the audio reactive effects. You can leave the submix parameter inside the AudioSpectrum property of the effect empty and it will automatically listen on the project’s default submix.
- If you divide your ingame audio into different submixes like music, sound effects, voice chat etc. you will need to set the correct submix in the submix parameter inside the AudioSpectrum property of the effect. For instance if you have a MusicSubmix for background music, you can set this MusicSubmix and enable the effect to react to the background music only.
If the effects do not react to audio
- ensure that there is audio in game. you can use the AudioAnalysisTool to playback sounds or to capture audio (see the previous sections)
- check the submixes of the effects. select the effects and expand the AudioSpectrum property. There is a submix parameter. If this is empty, the effect will listen to the master submix that is set in the audio section of the project settings.
- if multiple submixes are used in the game, be sure to select the correct submix for the effects and also be sure that the actual audio sources like music and sound effects send to the correct submix
Common effect parameters
There are some common effect parameters, that are shared by most of the effects. These are
- AudioSpectrum: defines the submix to analyse, spectrum resolution, min and max frequency
- AudioThreshold: the audio amplitude needs to exceed this threshold to have a visual effect. set this to 0.1 or 0.2 to cancel low volume noise if needed
- GradientIndex OR ColorGradient: defines which gradient to use. See the “CurveAtlas_Color_01” in the “Materials/ColorCurves” folder to get the order of gradients. When new gradients are added, change the “NumberOfCurveAtlasCurves” in the “MPC_GlobalMaterialParameters” asset in the “Materials/MaterialParameterCollections” to be the same number as the number of gradients in the atlas. If this is not done, some of the effects might take the wrong gradients.
- GradientMinimum & GradientMaximum: when these are present, they can be used to stretch the used gradient to better fit the audio.
- SpectrumRangeStart & SpectrumRangeEnd: use to set the range of the spectrum analyzer, where 0 corresponds to the MinimumFrequency and 1 to the MaximumFrequency
- Parameters with “Emissive”,”Glow” or “Brightness” have an effect on the glow behavior
- Parameters that start with “SpectrumTo”, or end with “FromAudio” control the effect of the audio spectrum on various other parameters
Note that parameters that end on “_RESET” will need to reset or rebuild the actor ingame if changed at runtime. Otherwise the parameter change will not take effect. You can ignore this if you do not change the parameters at runtime in a packaged build.
Some effects are based on one of the contained Niagara emitters in the Emitters folder. These can be used to create similar effects.
Using Splines
Some of the effects can use splines to follow their path. These effects usually may have “spline” in their name or have a parameter named “LineInsteadOfSpline”. The parameter turns off the spline follow functionality and uses a parametric line instead. This is usually enabled by default as the spline can only be added in a map and not in the particle editor. Thus, following a non existent spline would lead to a glitching effect. If you want to use a spline simply add a spline to the actor that holds the Niagara effect in the map. To be totally safe you can make the spline the parent in the actor’s hierarchy. This can also be done in blueprints. A few blueprints with splines and effects are contained in the pack to demonstrate how it is done.